By the end of this post you’ll have Detox driving an iOS simulator and an Android emulator, with Cucumber feature files written in plain English sitting on top. Five steps: install Detox, wire up Cucumber, write the support layer, write a feature, run it.
A quick word on the pairing
Detox + Cucumber isn’t the default React Native E2E stack. Most teams stay imperative with Jest as the runner, or reach for WebdriverIO / Maestro when they want flow-style tests. Those are reasonable choices. Maestro especially is lovely if all you want is to record a flow.
So why add a BDD layer on top of Detox?
Because once feature files exist, the QA folks and the PMs can read them. They can ask for scenarios you’d never think to write. Imperative Detox keeps test design inside engineering. Cucumber moves it outside.
The cost is two more dependencies and a support layer. The cost is small, in my experience, once the step definitions stabilise. New scenarios become a five-minute job.
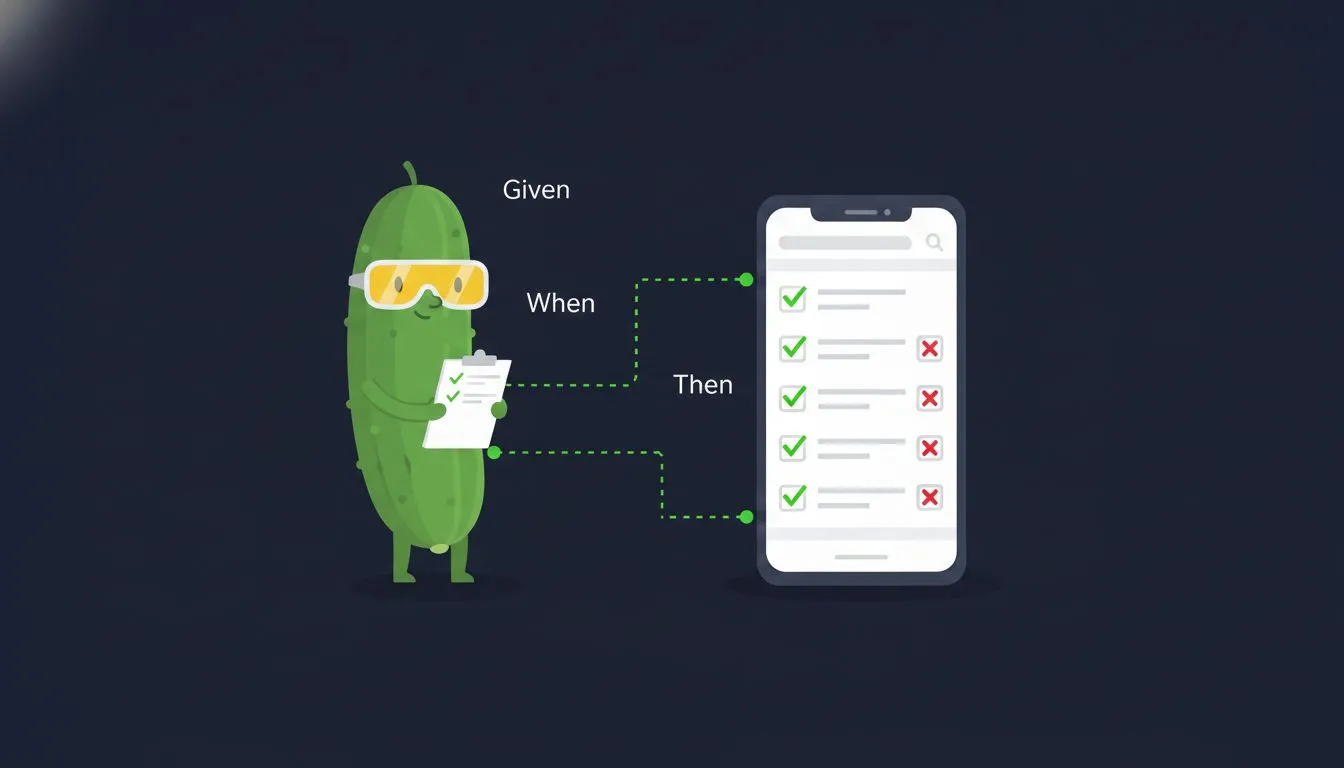
Why BDD for E2E tests
Most Detox examples show imperative test code:
await element(by.id('email-input')).typeText('user@example.com');
await element(by.id('password-input')).typeText('password123');
await element(by.id('login-button')).tap();
await expect(element(by.id('home-screen'))).toBeVisible();
This works. It reads like code, not like a test specification. When a PM asks “what does the login test actually cover?”, you point them at a TypeScript file.
Cucumber lets you write the same test in Gherkin:
Feature: User Authentication

  Scenario: Successful login
    Given the app is launched
    And I am on the "Login" screen
    When I type "user@example.com" into the input with testID "email-input"
    And I type "password123" into the input with testID "password-input"
    And I tap the "Login" button
    Then I should see the "Home" screen
Same Detox commands underneath. Anyone on the team can now read the test, review it, and suggest the scenarios you’ve missed. When one fails, the line that broke is in plain language, not in TypeScript.
Assumptions
This walkthrough is written against:
- React Native 0.74+ (bare workflow, not Expo)
- TypeScript with the standard RN Babel config
- macOS host (iOS simulator and Android emulator)
- Xcode 16+ with Command Line Tools, plus an iOS simulator created (e.g. iPhone 16)
- Android Studio with at least one AVD created (e.g. Pixel 7 API 35)
- Node 18 or later
I built this on Detox 20, @cucumber/cucumber 12, ts-node, and a recent React Native. The pieces most likely to drift are the Detox init signature and the Cucumber config keys, so I’ve noted both inline.
If you’re on Expo, Detox needs a custom dev client. The Cucumber layer is the same regardless.
Step 1. Install Detox and Cucumber
Detox, Cucumber, and the TypeScript loader as dev dependencies:
yarn add -D detox @cucumber/cucumber ts-node tsconfig-paths
cd ios && pod install && cd ..
The iOS pod install is needed because Detox ships native code that has to be linked into the test build.
You also need two host-level tools that aren’t npm packages:
brew tap wix/brew
brew install applesimutils
applesimutils is what Detox uses to drive the iOS simulator. For Android, you need a working emulator. Detox’s CLI is invoked via npx detox, so no global install is needed.
Step 2. The three config files
Three files wire everything together: .detoxrc.js (or detox.config.js. Detox accepts both), cucumber.js, and a slim tsconfig.cucumber.json. The Cucumber config must be named cucumber.js (or .cjs/.mjs/.json): that’s the filename cucumber-js loads by default, and nothing in this setup passes an explicit --config.
.detoxrc.js
The Detox configuration defines your app builds and device targets:
One thing .detoxrc.js does NOT do here: connect Detox to Cucumber. When Cucumber is the runner, you invoke cucumber-js directly and Detox’s own testRunner config is never consulted; the support file in step 3 is the only bridge. .detoxrc.js just describes apps and devices:
module.exports = {
  apps: {
    'ios.debug': {
      type: 'ios.app',
      binaryPath: 'ios/build/Build/Products/Debug-iphonesimulator/YourApp.app',
      build: 'xcodebuild -workspace ios/YourApp.xcworkspace -scheme YourApp -configuration Debug -sdk iphonesimulator -derivedDataPath ios/build',
    },
    'android.debug': {
      type: 'android.apk',
      binaryPath: 'android/app/build/outputs/apk/debug/app-debug.apk',
      build: 'cd android && ./gradlew assembleDebug assembleAndroidTest -DtestBuildType=debug',
    },
  },
  devices: {
    simulator: {
      type: 'ios.simulator',
      device: { type: 'iPhone 16' },
    },
    emulator: {
      type: 'android.emulator',
      device: { avdName: 'Pixel_7_API_35' },
    },
  },
  configurations: {
    'ios.sim.debug': {
      device: 'simulator',
      app: 'ios.debug',
    },
    'android.emu.debug': {
      device: 'emulator',
      app: 'android.debug',
    },
  },
};
cucumber.js
The Cucumber configuration says where feature files live, where step definitions live, and how to format output:
require('ts-node').register({
  transpileOnly: true,
  compilerOptions: { module: 'commonjs', jsx: 'react' },
});

module.exports = {
  default: {
    paths: ['src/features/**/__tests__/*.feature', 'e2e/**/*.feature'],
    require: [
      'src/test-utils/cucumber/support/**/*.ts',
      'src/test-utils/cucumber/step-definitions/**/*.{ts,tsx}',
      'src/**/__tests__/**/*.cucumber.{ts,tsx}',
    ],
    format: ['./src/test-utils/cucumber/formatters/CheckmarkFormatter.js'],
    formatOptions: { colorsEnabled: true },
    strict: true,
    parallel: 2,
    retry: 1,
  },
};
Registering ts-node at the top of the config file (rather than via requireModule) is the path of least resistance with current Cucumber. It also lets you keep the compiler options local.
| Option | What it does |
|---|---|
paths | Where Gherkin feature files live |
require | Where step definitions and support files live |
format | Custom formatter for readable output |
strict | Fails on undefined or pending steps |
parallel | Number of parallel workers |
retry | Retries for flaky tests in parallel mode |
tsconfig.cucumber.json
A slim TypeScript config for the Cucumber runtime, separate from the main app tsconfig:
{
  "compilerOptions": {
    "module": "commonjs",
    "target": "ES2020",
    "lib": ["ES2020"],
    "moduleResolution": "node",
    "jsx": "react",
    "esModuleInterop": true,
    "skipLibCheck": true,
    "isolatedModules": true,
    "strict": false,
    "baseUrl": ".",
    "paths": { "@app/*": ["src/*"] },
    "types": ["node", "detox"]
  },
  "include": ["src/**/*.ts", "src/**/*.tsx"]
}
Two things to flag. "types": ["node", "detox"] is what teaches TypeScript that device, element, by, and waitFor are global. Without it, every step definition lights up red on device.launchApp. "strict": false is a pragmatic choice for test files (you’ll thank yourself when wrestling with optional chains in scenario results).
Point cucumber-js at this config via TS_NODE_PROJECT=tsconfig.cucumber.json in the npm script.
Step 3. The support layer
Three files set up the Detox lifecycle inside Cucumber: detox-setup.ts, hooks.ts, and world.ts.
detox-setup.ts
Detox 20 exposes its programmatic lifecycle through the detox/internals entry point. The public 'detox' import gives you device, element, by, waitFor. The lifecycle hooks (init, cleanup, onTestStart, onTestDone) sit under 'detox/internals':
import detox from 'detox/internals';

export const setupDetox = async (workerId: string = '0') => {
  const config = process.env.DETOX_CONFIGURATION;
  if (!config) {
    throw new Error('DETOX_CONFIGURATION is not set (e.g. ios.sim.debug)');
  }
  await detox.init({ workerId: `cucumber-worker-${workerId}` });
};

export const cleanupDetox = async () => {
  await detox.cleanup();
};

export { detox };
hooks.ts
The glue between Cucumber’s lifecycle and Detox’s device management:
import { After, AfterAll, Before, BeforeAll, Status } from '@cucumber/cucumber';
import { device } from 'detox';

import { cleanupDetox, detox, setupDetox } from './detox-setup';
import { DetoxWorld } from './world';

BeforeAll({ timeout: 180 * 1000 }, async function () {
  const workerId = process.env.CUCUMBER_WORKER_ID ?? '0';
  await setupDetox(workerId);
  await device.launchApp({
    newInstance: true,
    launchArgs: { detoxEnableSynchronization: 0 },
  });
  await device.enableSynchronization();
});

Before({ timeout: 30000 }, async function (this: DetoxWorld, { pickle }) {
  await detox.onTestStart({
    title: pickle.name,
    fullName: pickle.name,
    status: 'running',
  });
  await device.reloadReactNative();
});

After(async function (this: DetoxWorld, { pickle, result }) {
  const testStatus = result?.status === Status.PASSED ? 'passed' : 'failed';
  if (result?.status === Status.FAILED) {
    try {
      await device.takeScreenshot(pickle.name);
    } catch (error) {
      console.error('Failed to take screenshot:', error);
    }
  }
  await detox.onTestDone({
    title: pickle.name,
    fullName: pickle.name,
    status: testStatus,
  });
});

AfterAll(async function () {
  await cleanupDetox();
});| Hook | Timeout | What it does |
|---|---|---|
BeforeAll | 180s | Boots the simulator, launches the app |
Before | 30s | Reloads React Native for a fresh state per scenario |
After | default | Takes a screenshot on failure, notifies Detox |
AfterAll | default | Tears down Detox |
The synchronisation dance matters. Launch with synchronisation disabled (detoxEnableSynchronization: 0), then re-enable it after the app is running. This sidesteps the Detox timeout you hit when the initial bundle load is slow.
world.ts
A custom Cucumber World that carries Detox context between steps:
import { IWorldOptions, setWorldConstructor, World } from '@cucumber/cucumber';
import { device } from 'detox';

export class DetoxWorld extends World {
  device: typeof device;
  testID: string | null;

  constructor(options: IWorldOptions) {
    super(options);
    this.device = device;
    this.testID = null;
  }

  setTestID(id: string) { this.testID = id; }
  getTestID(): string {
    if (!this.testID) throw new Error('No testID set');
    return this.testID;
  }
}

setWorldConstructor(DetoxWorld);
Calling setWorldConstructor is what wires this class into every this inside a step. Forget that call and this.device is undefined.
Step 4. Writing your first feature file
Feature files are plain text with Gherkin syntax. Each scenario describes a user flow. Drop a file at src/features/Auth/__tests__/Login.feature:
Feature: User Authentication

  Scenario: Successful login
    Given the app is launched
    And I am on the "Login" screen
    When I type "testuser@example.com" into the input with testID "email-input"
    And I type "SecurePass123" into the input with testID "password-input"
    And I tap the "Login" button
    Then I should see the "Home" screen

  Scenario: Login with invalid credentials
    Given the app is launched
    And I am on the "Login" screen
    When I type "testuser@example.com" into the input with testID "email-input"
    And I type "WrongPassword" into the input with testID "password-input"
    And I tap the "Login" button
    Then I should see text "Invalid email or password"

  Scenario: Deep link opens password reset
    Given the app is launched via password reset deep link
    Then I should see the "Reset Password" screen
Tags let you filter which scenarios to run:
@accessibility @voiceover @ios
Feature: VoiceOver Gestures

  @eaa
  Scenario: Navigate login form with swipe gestures
    ...
Then in your test command:
yarn detox:ios:test --tags "@accessibility and @ios"Step 5. Writing step definitions
Each Gherkin step maps to a function. The step definitions are the bits you’ll reuse across every feature file once they exist.
A note on Detox globals before we go further: device, element, by, and waitFor exist at compile time because step 2’s tsconfig.cucumber.json declared them ("types": ["detox", "node"]). Skip that and every step definition shows red squigglies on device.launchApp.
Common steps
import { Given, When, Then } from '@cucumber/cucumber';

Given('the app is launched', async function () {
  await device.terminateApp();
  await device.clearKeychain(); // iOS only: a silent no-op on Android
  await device.launchApp({ newInstance: true });
  await new Promise(r => setTimeout(r, 500));
});

Given('I am on the {string} screen', async function (screen: string) {
  const testID = `${screen.toLowerCase().replace(/\s+/g, '-')}-screen`;
  await waitFor(element(by.id(testID)))
    .toBeVisible()
    .withTimeout(20000);
});

When('I tap the {string} button', async function (name: string) {
  const testID = `${name.toLowerCase().replace(/\s+/g, '-')}-button`;
  await element(by.id(testID)).tap();
});

When('I type {string} into the input with testID {string}',
  async function (text: string, testID: string) {
    await waitFor(element(by.id(testID)))
      .toBeVisible()
      .withTimeout(5000);
    await element(by.id(testID)).replaceText(text);
  }
);

Then('I should see the {string} screen', async function (screen: string) {
  const testID = `${screen.toLowerCase().replace(/\s+/g, '-')}-screen`;
  await new Promise(r => setTimeout(r, 500));
  await waitFor(element(by.id(testID)))
    .toBeVisible()
    .withTimeout(20000);
});

Then('I should see text {string}', async function (text: string) {
  await waitFor(element(by.text(text)))
    .toBeVisible()
    .withTimeout(5000);
});
Three patterns to lock in here. First, a consistent testID convention: screen names become kebab-case with a -screen or -button suffix. “Login” maps to login-screen, “Home” to home-screen, “Submit” to submit-button. Second, every assertion goes through waitFor with a timeout, not raw expect. Animations and network calls need settling time and expect doesn’t give it to them. Third, replaceText over typeText. typeText appends to whatever’s already there. replaceText clears first. For form inputs you want the second.
Save the file as src/test-utils/cucumber/step-definitions/common.cucumber.tsx and Cucumber picks it up via the glob in your cucumber.js.
Element finding strategies
Sometimes by.id() isn’t enough. A step definition that doesn’t break across iOS and Android tries multiple strategies:
When('I tap the text {string}', async function (text: string) {
  try {
    await element(by.text(text)).tap();
  } catch {
    try {
      await element(by.label(text)).tap();
    } catch {
      const testID = text.toLowerCase().replace(/\s+/g, '-');
      await element(by.id(testID)).tap();
    }
  }
});
Try by.text() first (visible text), fall back to by.label() (accessibility label), then by.id() (testID). This handles buttons that render text differently across platforms.
What the app talks to during these tests
The scenarios above type credentials and expect a Home screen, which raises the question every E2E setup has to answer: what backend is the app hitting? Run it against a real one and your suite fails whenever staging hiccups. The deterministic answer is to mock at the bundle level with an E2E build flag, which is its own post: Metro runtime mocking for deterministic React Native E2E tests. Until you have that layer, point the E2E build at a stable test environment and treat network flakes as suite failures, not test failures.
A custom formatter
Cucumber’s default output is noisy. A custom formatter gives you clean results that are easier to read in CI logs:
✓ Feature: User Authentication
  ✓ Scenario: Successful login (2340ms)
    ✓ Given the app is launched (890ms)
    ✓ And I am on the "Login" screen (450ms)
    ✓ When I type "testuser@example.com" into the input with testID "email-input" (120ms)
    ✓ And I type "SecurePass123" into the input with testID "password-input" (95ms)
    ✓ And I tap the "Login" button (85ms)
    ✓ Then I should see the "Home" screen (700ms)

  ✗ Scenario: Login with expired token (1890ms)
    ✓ Given the app is launched (850ms)
    ✓ And I am on the "Login" screen (420ms)
    ✗ Then I should see the "Session Expired" screen (620ms)
      Error: Element not found: session-expired-screen

2 scenarios (1 passed, 1 failed)
12 steps (11 passed, 1 failed)
The formatter is a small class that subscribes to Cucumber’s envelope events (testStepFinished, testCaseFinished), maps each step’s status to an icon and colour, and prints the line. About 80 lines all in.
The full version in my repo tracks pickles, maps test steps back to their Gherkin text, times each step, and prints a summary with pass and fail counts. The sketch above is the shape; the full file is src/test-utils/cucumber/formatters/CheckmarkFormatter.js in the repo linked at the end.
Parallel execution
Detox can run scenarios across multiple simulators. Cucumber’s parallel setting drives the worker count, and each worker gets its own Detox instance.
# Run with 3 parallel simulators
DETOX_WORKERS=3 yarn detox:ios:test:parallel
The BeforeAll hook reads CUCUMBER_WORKER_ID and passes it to setupDetox so each worker initialises against its own simulator. Cucumber distributes scenarios across workers for you.
| Setting | Local | CI |
|---|---|---|
| iOS workers | 2-3 | 3 |
| Android workers | 1-2 | 2 |
| Retry on failure | 1 | 1 |
| Fail fast | No | No |
One tip on parallel runs. Keep fail-fast off when running in parallel. One flaky scenario shouldn’t kill the other workers, and with retry enabled the flake gets a second chance while the rest keep going. On a single-worker run, fail-fast on is fine.
Accessibility testing with BDD
Detox doesn’t drive VoiceOver or TalkBack directly. Manual screen reader testing still has a job to do. What Detox can check is whether the right accessibility labels, roles, and traits are set on every element. Written as Gherkin scenarios, those checks catch a class of regression that nobody is going to notice manually until a user with VoiceOver opens the app.
My repo has two feature files for this, one for iOS patterns and one for Android.
@accessibility @voiceover @ios @eaa
Feature: VoiceOver Gestures

  Scenario: Navigate login form with swipe right
    Given the app is launched
    And I am on the "Login" screen
    And VoiceOver focus is on the "Email" element
    When I swipe right to move to the next element
    Then VoiceOver focus should move to the next element
    And I should hear the accessibility label for "Password"

  Scenario: Activate login button with double tap
    Given the app is launched
    And I am on the "Login" screen
    And I have entered valid credentials
    And VoiceOver focus is on the "Login" button
    When I double tap to activate
    Then I should see the "Home" screen

  Scenario: Error announced via live region
    Given the app is launched
    And I am on the "Login" screen
    And I have entered invalid credentials
    When I double tap to activate
    Then the error message should be announced via a live region
The step definitions for accessibility testing maintain state:
interface AccessibilityState {
  focusedElementIndex: number;
  visitedElements: string[];
  lastAnnouncement: string | null;
  granularity: 'characters' | 'words' | 'lines' | 'headings' | 'default';
}
This tracks expected focus order, announcement text, and reading granularity. Around 50 scenarios across the two feature files cover labels, focus behaviour, live region announcements, and custom actions. They don’t replace a manual pass with a real screen reader. They do stop the obvious regressions from shipping.
Run it
The scripts I use sit in package.json like this:
{
  "scripts": {
    "detox:ios:build": "detox build -c ios.sim.debug",
    "detox:ios:test": "DETOX_CONFIGURATION=ios.sim.debug TS_NODE_PROJECT=tsconfig.cucumber.json cucumber-js",
    "detox:ios:test:parallel": "yarn detox:ios:test --parallel ${DETOX_WORKERS:-2} --retry 1",
    "e2e:ios": "yarn detox:ios:build && yarn detox:ios:test"
  }
}
Note the test script runs cucumber-js directly rather than detox test. With Cucumber as the runner, you don’t go through Detox’s runner wrapper. Detox is initialised from your support file.
First run:
yarn e2e:ios$ detox build -c ios.sim.debug
Building app for ios.sim.debug...
xcodebuild ... ** BUILD SUCCEEDED **
$ cucumber-js
✓ Feature: User Authentication
✓ Scenario: Successful login (2340ms)
✓ Scenario: Login with invalid credentials (1820ms)
2 scenarios (2 passed)
12 steps (12 passed)If xcodebuild fails on the first run, check that the simulator named in .detoxrc.js actually exists (xcrun simctl list devices). The most common first-run trip is a hard-coded iPhone 16 that you never created in Xcode.
Common pitfalls
Synchronisation is the hardest part. Detox tries to wait for the app to be idle automatically, but animations, timers, and network calls can confuse it. The launch-with-sync-disabled pattern (detoxEnableSynchronization: 0 then enableSynchronization() after) sidesteps the most common timeout.
typeText appends, replaceText replaces. If a field has placeholder text or previous input, typeText adds to it. Use replaceText for form inputs where you want a clean value.
Screenshots on failure. The After hook captures a screenshot when a scenario fails. Without this, debugging CI failures is squinting at logs. Name the screenshot after the scenario so you can match a failure to its image.
Describe behaviour, not implementation. Write “When I log in”, not “When I type into email-input and tap login-button”. The implementation details belong in step definitions, not in the Gherkin. If a non-engineer can’t read the feature file aloud and understand it, you’ve leaked detail into the wrong layer.
The full file structure
src/
  test-utils/
    cucumber/
      formatters/
        CheckmarkFormatter.js    # Custom ✓/✗ formatter
      step-definitions/
        common.cucumber.tsx      # Shared steps (tap, type, navigate)
        auth.cucumber.tsx         # Authentication steps
        accessibility.cucumber.tsx # VoiceOver + TalkBack steps
      support/
        detox-setup.ts           # Detox initialisation
        hooks.ts                  # BeforeAll/Before/After/AfterAll
        world.ts                  # Cucumber World context
e2e/
  accessibility/
    VoiceOverGestures.feature    # iOS screen reader tests
    TalkBackGestures.feature     # Android screen reader tests
What you get
The setup is a morning’s work. The first feature file is an afternoon. After that, adding scenarios is fast because the step definitions are reusable across features.
What you’ve built by the end:
- Tests that anyone on the team can read. Product, QA, designers. The Gherkin file is the spec and the test in one place, and when a scenario fails, the report names the step that broke rather than a line of test code.
- Parallel execution that works with Detox. Three simulators, three workers, three times faster on CI.
- Accessibility regression coverage. Around 50 scenarios verifying labels, roles, and traits. Not a swap for manual screen reader testing, but a net that stops the obvious regressions from reaching QA.
This post covers E2E testing. For unit and integration tests I use MSW v2 to mock the network layer instead of jest.fn(). The two pair well: MSW for fast, focused tests against real HTTP calls; Detox + Cucumber for full user flows on a real device.
The code in this post is from rn-warrendeleon, my personal React Native project. The full Detox + Cucumber setup, step definitions, custom formatter, and accessibility feature files all live there.